More actions
| PSP MS Management Tool | |
|---|---|
 | |
| General | |
| Author | 468 |
| Type | File Operation |
| Version | 2.08.01 |
| License | Mixed |
| Last Updated | 2005/02/07 |
| Links | |
| Download | |
| Website | |
A tool for managing files on the PSP’s Memory Stick.
Environment: Windows2000, XP
Features
- Displays the available free space on the Memory Stick with a bar graph.
- Lists MP3 files with their tags.
- Supports file operations in directories. (Viewing images other than JPG requires the Susie plugin.)
- Supports drag-and-drop files and folders. (Folders are limited to one at a time.)
- Convert text to JPEG.
User guide
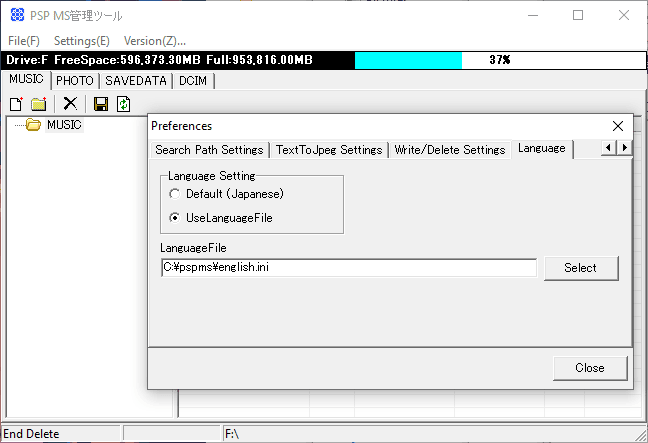
To change the language, navigate to "Settings (E)" in the menu. Open "Preferences (K)", go to the "Language" tab, check "UseLanguageFile", and select english.ini. Restart the application for the changes to take effect.
Drive settings
To set up your MS (PSP) with a volume label of "PSP," connect it to your PC, launch the application, and go to "Settings" > "Preferences" > "Drive Settings." Select the MS (PSP) drive and click "Set" to label it "PSP," then restart the application.
When the application detects an MS (PSP) labeled "PSP," it will automatically create the MUSIC, PHOTO, and SAVEDATA folders under the PSP folder if they don't already exist. If the MS (PSP) is not connected at startup, the application will recognize it upon connection.
You don't need to set a search path for these operations. However, if you want to create a virtual environment on your PC to mirror the PSP MS, you can specify the directory one level up from the PSP folder by selecting "File" > "Open" from the menu. Note that this search path setting is secondary to automatic detection of the MS (PSP).
MUSIC/PHOTO
In general, there are no differences in operation between the MUSIC and PHOTO sections, other than the type of files being loaded.
The types of files that can be written are as follows:
- MUSIC: .mp3
- PHOTO: .jpg, .jpeg, .bmp
To add .png support, create a folder named spi where PSPMS.exe is located, then place the Susie32 PNG Plug-in in the folder.
(Note: If you write a bitmap file to the PHOTO section, it will automatically be converted to JPEG.)
Convert TXT to JPEG
To add a text file to the PHOTO folder, click on the icon labeled "TXT" to open the file selection dialog, and then open a file with the ".txt" extension. If you want to write files with extensions other than ".txt," you can copy the file on your PC and change its extension to ".txt."
When you open the file, you will be prompted to enter a name for the folder where the converted image will be saved. If the folder exists, the process will be canceled; if not, it will be created and the conversion will proceed.
Settings related to image conversion can be adjusted in the menu, under "Settings" > "Preferences" > "TextToJpeg Settings":
- Set Background Image - Choose an image for the background; if none is selected, the background color will be used.
- Margin - Sets the space between text and image edges.
- Image Quality - Ranges from 1 to 100; higher values mean better quality and larger file sizes.
- Background Color - Used if no background image is available or valid.
- Font - Sets the font for the text. It is recommended not to use excessively large font sizes.
SAVEDATA
In the SAVEDATA section, you cannot write files individually, or write to folders that do not contain save data.
When copying save data to the PC with the "Copy to HDD" option, if a folder with the same name already exists, the application will append a sequential number such as "(1)" at the end of the folder name to avoid duplication.
Please note that when using drag-and-drop (instead of "Copy to HDD"), the application will not append a sequential number if a folder with the same name already exists.
Screenshots
External links
- PSPwiki - http://pspwiki.to/