More actions
No edit summary |
m (Text replacement - "Category:3DS homebrew applications" to "") |
||
| (3 intermediate revisions by the same user not shown) | |||
| Line 4: | Line 4: | ||
|description=Yet another nds-bootstrap forwarder. Runs from 3DS-mode. | |description=Yet another nds-bootstrap forwarder. Runs from 3DS-mode. | ||
|author=lifehackerhansol | |author=lifehackerhansol | ||
|lastupdated=2022/ | |lastupdated=2022/11/29 | ||
|type=Forwarders and Virtual Console Injectors | |type=Forwarders and Virtual Console Injectors | ||
|version=1.6. | |version=1.6.3 | ||
|license=GPL-2.0 | |license=GPL-2.0 | ||
|download=https://dlhb.gamebrew.org/3dshomebrews/yanbf3ds.7z | |download=https://dlhb.gamebrew.org/3dshomebrews/yanbf3ds.7z | ||
| Line 22: | Line 22: | ||
==Installation== | ==Installation== | ||
* | *Download the latest release for your PC OS. | ||
*[https://github.com/RocketRobz/NTR_Forwarder/releases Go here] and download the zip file (not the source code). | |||
* | *Extract the zip files. | ||
* Download the latest [https://github.com/DS-Homebrew/TWiLightMenu/releases TWiLight Menu++ | *From the DS Game Forwarder Pack, copy everything in the for SD card root folder to your SD card root. | ||
*From YANBF, copy bootstrap.cia to the sd:/cias/ folder. | |||
*If this folder doesn't exist, make one. | |||
*Download the latest [https://github.com/DS-Homebrew/TWiLightMenu/releases TWiLight Menu++]. Only get the 3DS.7z file | |||
*In the 7z file, go to _nds, TWiLightMenu, and extras. | |||
*Drag the apfix.pck and widescreen.pck file to sd:/_nds/ntr-forwarder/. | |||
If you are updating from old version: After downloading the updated generator, copy the id.txt file from the old release to the new one. You risk replacing your old forwarders without this. | |||
==User guide== | ==User guide== | ||
=== | ===Using the command-line program=== | ||
Open a terminal or command prompt and cd inside the generator folder. | |||
* | |||
Run "generator <path to ROM on your SD card>". | |||
*Make sure to replace <path to ROM on your SD card> with the full path to your ROM. | |||
* | *If you do not have your SD card inserted in your computer, you must provide a custom ROM path using -p <ROM path on SD>. | ||
**This ROM path must follow POSIX standards. | |||
**i.e. if your ROM on SD card is at "sd:/ROMs/ROM.nds", pass -p "/ROMs/ROM.nds". | |||
The resulting CIA will be generated in this same folder. Copy this to the sd:/cias folder. | |||
Boot your 3DS and install both CIAs using FBI. | |||
===Using the graphical user interface=== | |||
Open the generator folder, then: | |||
*Windows: Open YANBF-GUI.exe. | |||
*macOS: Open YANBF-GUI.dmg, then install YANBFGenerator app. | |||
*Linux: Open YANBF-GUI.AppImage. | |||
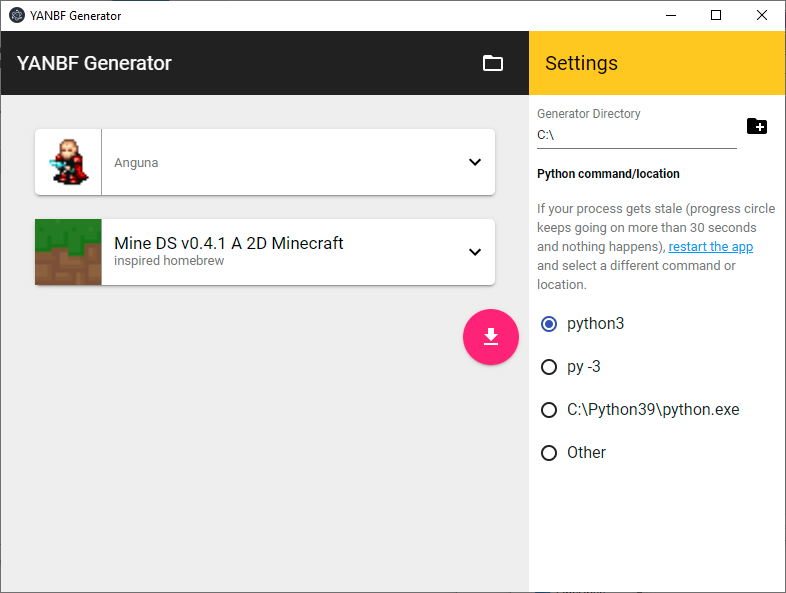
Set the generator directory to the path of your generator folder. A file browser icon next to the input can help with this. | |||
Drag and drop as many ROMs as you need on your SD card to the app. | |||
*If you do not have your SD card inserted in your computer, you must provide a custom ROM path in the drop-down options. | |||
*This ROM path must follow POSIX standards. | |||
*i.e. if your ROM on SD card is at "sd:/ROMs/ROM.nds", write "/ROMs/ROM.nds". | |||
Click the Download button to start the generation process. | |||
The resulting CIA will be generated in this same folder. Copy this to the sd:/cias folder. | |||
Boot your 3DS and install all CIAs using FBI. | |||
=== | ===Creating your own banners=== | ||
* | *For a quick tutorial, refer to [https://gbatemp.net/threads/609242/ @Yrouel's post here]. | ||
*Technical definitions: | |||
* | **Image must be in PNG format. It must be 256x128. You can center your image accordingly, but the resulting file must be that size or it will fail to generate. | ||
**Sound must be in WAV format, 16-bit, and shorter than 3 seconds. Otherwise, the 3DS will fail to render the banner entirely. | |||
*Want to share? See [https://github.com/YANBForwarder/assets#contribution-guidelines here]. Images are mandatory. Sound is optional. | |||
==Screenshots== | ==Screenshots== | ||
| Line 51: | Line 80: | ||
==Changelog== | ==Changelog== | ||
'''v1.6.3: yo my server died''' | |||
*IMPORTANT WHEN UPDATING: After downloading the updated generator, copy the id.txt file from the old release to the new one. YOU RISK REPLACING YOUR OLD FORWARDERS WITHOUT THIS. | |||
Bug fixes: | |||
*Dependency on the YANBF API has been removed entirely, and now directly accesses GitHub for the assets. | |||
*The API broke and doesn't want to fix itself. There's no point keeping it up anymore. | |||
*Fixes [https://github.com/YANBForwarder/YANBF/issues/42 #42]. | |||
'''v1.6.2: This is why reading is important''' | '''v1.6.2: This is why reading is important''' | ||
Improvements | Improvements: | ||
*Another debugging string has been added to the log. | *Another debugging string has been added to the log. | ||
| Line 59: | Line 96: | ||
**Before this, it would silently succeed with the wrong path, or with the / character removed. This is no longer an issue and forces people to read the instructions on why it broke. | **Before this, it would silently succeed with the wrong path, or with the / character removed. This is no longer an issue and forces people to read the instructions on why it broke. | ||
Known issues | Known issues: | ||
*DSiWare is not supported, as GameTDB does not provide box art for them (of course they don't, they don't come in a box.) | *DSiWare is not supported, as GameTDB does not provide box art for them (of course they don't, they don't come in a box.) | ||
| Line 184: | Line 220: | ||
* GitHub - https://github.com/YANBForwarder/YANBF | * GitHub - https://github.com/YANBForwarder/YANBF | ||
* GBAtemp - https://gbatemp.net/threads/nds-yet-another-nds-bootstrap-forwarder-more-than-40-forwarders-are-now-possible.606138 | * GBAtemp - https://gbatemp.net/threads/nds-yet-another-nds-bootstrap-forwarder-more-than-40-forwarders-are-now-possible.606138 | ||
Latest revision as of 11:11, 6 Mayıs 2024
| YANBF | |
|---|---|
 | |
| General | |
| Author | lifehackerhansol |
| Type | Forwarders and Virtual Console Injectors |
| Version | 1.6.3 |
| License | GPL-2.0 |
| Last Updated | 2022/11/29 |
| Links | |
| Download | |
| Website | |
| Source | |
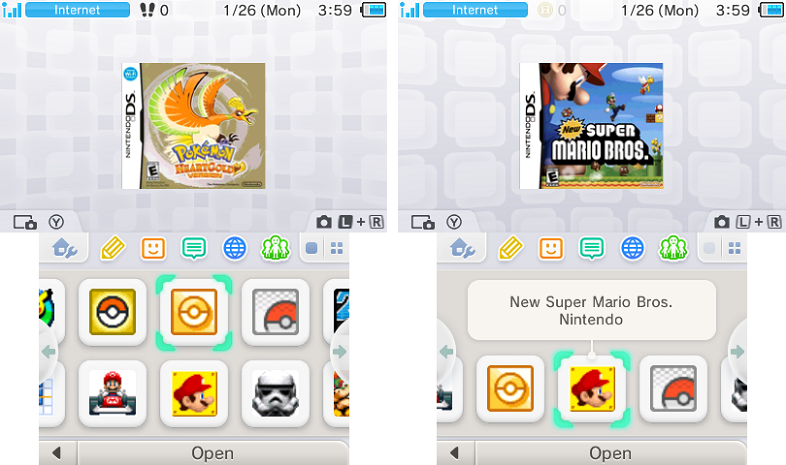
YANBF, or Yet Another nds-bootstrap Forwarder, is a forwarder structure for nds-bootstrap. This NDS forwarder launches from 3DS-mode, meaning you can install as many icons as you want until you max out all 300 Home Menu icon space.
The other implementation uses a DSiWare template and is limited to 40 titles.
Features
- Launches from 3DS-mode.
- Updates can be installed via Universal Updater:
- nds-bootstrap, bootstrap.cia, AP/Widescreen patches and SD card template will all be installed accordingly.
Installation
- Download the latest release for your PC OS.
- Go here and download the zip file (not the source code).
- Extract the zip files.
- From the DS Game Forwarder Pack, copy everything in the for SD card root folder to your SD card root.
- From YANBF, copy bootstrap.cia to the sd:/cias/ folder.
- If this folder doesn't exist, make one.
- Download the latest TWiLight Menu++. Only get the 3DS.7z file
- In the 7z file, go to _nds, TWiLightMenu, and extras.
- Drag the apfix.pck and widescreen.pck file to sd:/_nds/ntr-forwarder/.
If you are updating from old version: After downloading the updated generator, copy the id.txt file from the old release to the new one. You risk replacing your old forwarders without this.
User guide
Using the command-line program
Open a terminal or command prompt and cd inside the generator folder.
Run "generator <path to ROM on your SD card>".
- Make sure to replace <path to ROM on your SD card> with the full path to your ROM.
- If you do not have your SD card inserted in your computer, you must provide a custom ROM path using -p <ROM path on SD>.
- This ROM path must follow POSIX standards.
- i.e. if your ROM on SD card is at "sd:/ROMs/ROM.nds", pass -p "/ROMs/ROM.nds".
The resulting CIA will be generated in this same folder. Copy this to the sd:/cias folder.
Boot your 3DS and install both CIAs using FBI.
Using the graphical user interface
Open the generator folder, then:
- Windows: Open YANBF-GUI.exe.
- macOS: Open YANBF-GUI.dmg, then install YANBFGenerator app.
- Linux: Open YANBF-GUI.AppImage.
Set the generator directory to the path of your generator folder. A file browser icon next to the input can help with this.
Drag and drop as many ROMs as you need on your SD card to the app.
- If you do not have your SD card inserted in your computer, you must provide a custom ROM path in the drop-down options.
- This ROM path must follow POSIX standards.
- i.e. if your ROM on SD card is at "sd:/ROMs/ROM.nds", write "/ROMs/ROM.nds".
Click the Download button to start the generation process.
The resulting CIA will be generated in this same folder. Copy this to the sd:/cias folder.
Boot your 3DS and install all CIAs using FBI.
Creating your own banners
- For a quick tutorial, refer to @Yrouel's post here.
- Technical definitions:
- Image must be in PNG format. It must be 256x128. You can center your image accordingly, but the resulting file must be that size or it will fail to generate.
- Sound must be in WAV format, 16-bit, and shorter than 3 seconds. Otherwise, the 3DS will fail to render the banner entirely.
- Want to share? See here. Images are mandatory. Sound is optional.
Screenshots


Changelog
v1.6.3: yo my server died
- IMPORTANT WHEN UPDATING: After downloading the updated generator, copy the id.txt file from the old release to the new one. YOU RISK REPLACING YOUR OLD FORWARDERS WITHOUT THIS.
Bug fixes:
- Dependency on the YANBF API has been removed entirely, and now directly accesses GitHub for the assets.
- The API broke and doesn't want to fix itself. There's no point keeping it up anymore.
- Fixes #42.
v1.6.2: This is why reading is important
Improvements:
- Another debugging string has been added to the log.
- The program will now fail if the ROM is detected to not be on the SD card, or if a custom path is not set.
- Before this, it would silently succeed with the wrong path, or with the / character removed. This is no longer an issue and forces people to read the instructions on why it broke.
Known issues:
- DSiWare is not supported, as GameTDB does not provide box art for them (of course they don't, they don't come in a box.)
v1.6.1
What's new?
- @spitzeqc: added custom path support to the GUI.
- SD card dependency is now fully removed.
Bug fix:
- @Epicpkmn11: fixed unicode paths for bannertool.
- Fixed an exception where converting images would write nowhere
Known issues:
- DSiWare is not supported, as GameTDB does not provide box art for them (of course they don't, they don't come in a box.)
v1.6.0
What's new?
- SD card dependency has been removed. (CLI only)
- You can now apply a custom ROM path that is different from the input ROM using -p <ROM path>
- This path must follow POSIX standards. This may be improved in the future.
- You can now apply a custom ROM path that is different from the input ROM using -p <ROM path>
- Unique ID is no longer based on the title's gamecode.
- Unique ID 0xFF400-0xFF7FF is allocated for YANBF.
- A new id.txt file is created and is used as a counter for Unique IDs.
- Should this file be lost, you may potentially start replacing older forwarders. Which isn't a huge loss, but annoying nonetheless.
Improvements:
- Some reworking of the code. Not visible to the end user, just made the thing more maintainable really.
- libscrc has been replaced with a custom CRC16 function
- GBATEK swiCRC16 pseudocode provided by nocash. Thanks nocash!
Bug fix:
- The GameTDB access will ping the EN endpoint if the album artwork is not found on the correct region.
- Apparently this is intended behaviour. Weird but oh well, another ping isn't taxing.
Known issues:
- As is standard for YANBF releases, the GUI is always one step behind in functionality. So passing a custom ROM path will not work for now.
- DSiWare is not supported, as GameTDB does not provide box art for them (of course they don't, they don't come in a box.)
v1.5.2
What's new?
- All repositories are consolidated to a YANBForwarder repository on GitHub.
- @spitzeqc: added sound support to the GUI.
Bug fix:
- Fixed an issue where the Linux release was mistakenly named macOS.
v1.5.1
Bug fix
- Attempted to fix Windows distribution being flagged as a virus.
- cx_Freeze is used in place of PyInstaller.
- Apps are now properly chmod +x'd.
- Linux and macOS releases are now double-zipped.
v1.5.0
What's new?
- A repository for community-provided custom banners and sounds is now open! https://github.com/lifehackerhansol/YANBF-assets
- As of this moment, only eCDP is provided. (Thanks Yrouel on GBAtemp!)
- Now YOU can make your own and share it to everyone!
- The program will search for a pre-existing custom banner beforehand, and default to the standard boxart if none are found.
Bug fix:
- Fixed an issue where UniqueID incrementing was out of range.
v1.4.0
What's new?
- Python dependency is now gone. Life is easy!
- A fork of the GUI was created to accomodate this release, for now. While the PR waits, anyway.
Bug fix:
- Fixed UniqueID searching where it wrongly detects more than one ID0.
- @Epicpkmn11: fixed bannergif module not properly detecting animated icons.
Known issues:
- The GUI still does not have a randomizing function, though with the UniqueID collision checking this is largely unnecessary.
v1.3.0
What's new?
- UniqueID randomizing is here.
- Not present in the GUI yet. You will need to do it via CLI.
- Pass -r as an argument to randomize.
- Launch splash has been changed from Homebrew to Nintendo 3DS.
Improvements:
- UniqueID collision checking is now implemented.
- This will require your Nintendo 3DS folder to be "clean". This means one ID0 folder and one ID1 folder only. If you have multiple, please clean them up.
- This works by checking all TIDLOW values that are present on the SD card. If the UniqueID calculated by YANBF already exists on the SD card, it will simply increment the UniqueID by 1 until it no longer collides.
- This may still collide with any titles that have not yet been installed. So this has a chance of potentially being replaced in the future by a retail game or some others homebrew app. There isn't a public database of this stuff or anything so unfortunately there is no guarantee.
Bug fix:
- Fixed an issue where the 3DS-side app may display "Failed to launch CIA" error for a brief moment before actually launching.
Credits
- devkitPro for their toolchain.
- RocketRobz for the TWLNAND bootstrap code.
- Epicpkmn11 for bannergif.py and testing.
- Olmectron for the GUI wrapper.
