|
|
| (14 intermediate revisions by the same user not shown) |
| Line 1: |
Line 1: |
| {{Infobox 3DS homebrew | | {{Infobox 3DS Homebrews |
| | title = Ultimate NES VC Injector | | |title=Ultimate NES VC Injector |
| | image = https://dlhb.gamebrew.org/3dshomebrew/UltimateNESVCInjectorfor3DS.jpg|250px | | |image=ultimatenesvcinjector5.png |
| | type = PC Utilities | | |description=A NES backup file and converts it to an installable CIA for your 3DS with CFW. |
| | version = v1.2 | | |author=Asdolo |
| | licence = Mixed | | |lastupdated=2016/11/08 |
| | author = Asdolo | | |type=Forwarders and Virtual Console Injectors |
| | website = https://gbatemp.net/threads/release-ultimate-nes-vc-injector-for-3ds.437415/ | | |version=1.2 |
| | download = https://dlhb.gamebrew.org/3dshomebrew/UltimateNESVCInjectorfor3DS.rar
| | |license=Mixed |
| | source = https://dlhb.gamebrew.org/3dshomebrew/UltimateNESVCInjectorfor3DS.rar
| | |download=https://dlhb.gamebrew.org/3dshomebrews/ultimatenesvcinjector.7z?k33p0fil35 1.1 / 1.2 |
| | |website=https://gbatemp.net/threads/release-ultimate-nes-vc-injector-for-3ds.437415 |
| }} | | }} |
| <youtube>jwk9hh_x1PY</youtube>
| | {{Obsolete}} |
|
| |
|
| '''<span style="font-size: 18px"><span style="color: rgb(255, 0, 0)">Current version: 1.2 (08-11-2016)</span></span>'''
| | Ultimate NES VC Injector for 3DS is a Windows program that takes a NES backup file and converts it to an installable CIA for your 3DS with CFW. |
|
| |
|
| | '''Note:''' This utility has been integrated into [[New Super Ultimate Injector 3DS|New Super Ultimate Injector]]. |
|
| |
|
| <div style="text-align: center">
| | ==Features== |
| | * VC NES injection into a CIA. |
| | * Easy made custom 3D banner. |
| | * Easy made custom text/footer banner. |
| | * Easy made screen size/aspect ratio configuration. |
| | * Easy made whole process. |
|
| |
|
| | ==User guide== |
| | Requirems Microsoft .NET framework 4.5 to use. |
|
| |
|
| ?
| | To use, follow the steps in program: |
| | * Rom file selection - Select your .nes rom file. |
| | * VC game icon and name - Complete the fields for the info boxes. |
| | * VC NES 3D banners - Edit the bottom banner, or you can import a custom one. |
| | * VC parameters - You can change the button layout and adjust the game screen size. |
|
| |
|
| </div>
| | Buttons layout options: |
| Hello everyone. Today I'm releasing a Windows tool that will make the NES injection process much easier and customizable. I'm introducing '''Ultimate NES VC Injector for 3DS'''.
| | * Y - Select, X - B, L+R+Y - Swap player1-player2 |
| | * Y - Nothing, X - VC menu (no 2nd player control) |
|
| |
|
| '''What does it do?:'''
| | Game screen size options: |
| It takes a NES backup file and converts it to an installable CIA for your 3DS with CFW. It does all in a one single program.
| | * 256x240 px (pixel perfect) |
| | * 284x240 px (VC original) |
| | * 360x240 px (like GBA games) |
| | * 400x240 pc (real fullscreen) |
|
| |
|
| '''Features:''' | | '''Note:''' If Disable dark filter If this is checked, there will not be any dark filter. You can preview the changes of this. |
|
| |
|
| | ==Screenshots== |
| | https://dlhb.gamebrew.org/3dshomebrews/ultimatenesvcinjector3.png |
|
| |
|
| * VC NES injection into a CIA
| | https://dlhb.gamebrew.org/3dshomebrews/ultimatenesvcinjector4.png |
| * Easy made custom 3D banner
| |
| * Easy made custom text/footer banner
| |
| * Easy made screen size/aspect ratio configuration
| |
| * Easy made whole process!
| |
|
| |
|
| | https://dlhb.gamebrew.org/3dshomebrews/ultimatenesvcinjector5.png |
|
| |
|
| '''Requeriments:''' Microsoft .NET framework 4.5
| | https://dlhb.gamebrew.org/3dshomebrews/ultimatenesvcinjector6.png |
|
| |
|
| '''Tutorial:'''
| | https://dlhb.gamebrew.org/3dshomebrews/ultimatenesvcinjector7.png |
| You'll just follow the steps in program. But just in case:
| |
|
| |
|
| | | ==Changelog== |
| <div class="ToggleTriggerAnchor bbCodeSpoilerContainer">
| | '''v1.2''' |
| | |
| <span>Spoiler: <span class="SpoilerTitle">Tutorial + screenshots</span></span>
| |
| <div class="SpoilerTarget bbCodeSpoilerText">
| |
| | |
| '''
| |
| Step 1:'''
| |
| | |
| <div class="ToggleTriggerAnchor bbCodeSpoilerContainer">
| |
| | |
| <span>Spoiler: <span class="SpoilerTitle">Rom file selection</span></span>
| |
| <div class="SpoilerTarget bbCodeSpoilerText">
| |
| | |
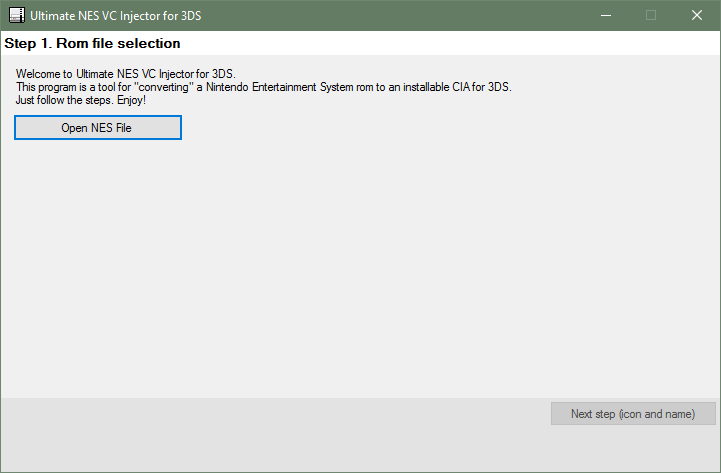
| Open the program. You'll see this screen:
| |
| [[File:proxy.php?image=https%3A%2F%2Fi.imgur.com%2FmH7hLnL.png&hash=9587cce10d2e81661b034a97a2908c79|class=bbCodeImage LbImage|[?IMG]]]
| |
| | |
| Press '''Open NES File''' button. It'll prompt you to pick a .nes file.
| |
| [[File:proxy.php?image=https%3A%2F%2Fi.imgur.com%2FLWXHWDA.png&hash=6929d0d71d441884a4b488c61741984a|class=bbCodeImage LbImage|[?IMG]]]
| |
| | |
| For this tutorial I'll pick the game [https://en.wikipedia.org/wiki/Battle_City_(video_game) Battle City].
| |
| | |
| When you pick a rom you'll be able to go to '''Step 2 (icon and name)'''.
| |
| | |
| </div>
| |
| | |
| </div>
| |
| | |
| '''Step 2:'''
| |
| | |
| <div class="ToggleTriggerAnchor bbCodeSpoilerContainer">
| |
| | |
| <span>Spoiler: <span class="SpoilerTitle">VC game icon and name</span></span>
| |
| <div class="SpoilerTarget bbCodeSpoilerText">
| |
| | |
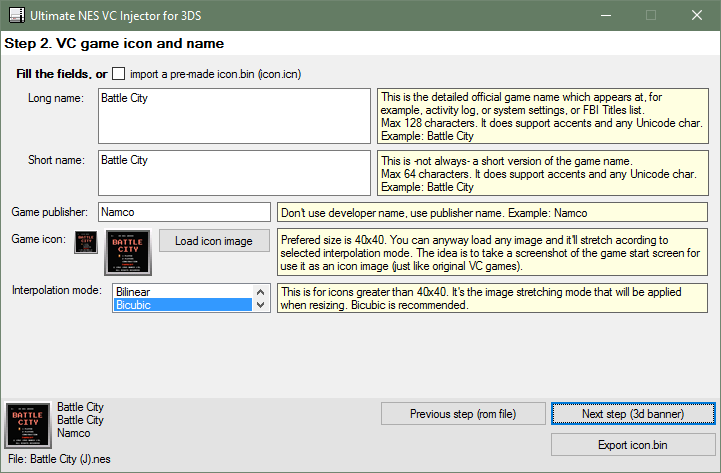
| This is the '''Step 2''' main screen:
| |
| [[File:proxy.php?image=https%3A%2F%2Fi.imgur.com%2F4jRMcUE.png&hash=47565d74a838af5afeedf927250c5ecf|class=bbCodeImage LbImage|[?IMG]]]
| |
| | |
| All the fields are explained in the info boxes, but let me know if something doesn't understand.
| |
| | |
| Complete the fields making the most legit as possible (if you want to). ''For example'':
| |
| [[File:proxy.php?image=https%3A%2F%2Fi.imgur.com%2FKZDxJ05.png&hash=84f7c8235b37c0bfd94b7061f1c80f8a|class=bbCodeImage LbImage|[?IMG]]]
| |
| | |
| I used a title screen screenshot in it's original size as icon (the program will automatically stretch it).
| |
| | |
| When you complete all the fields you'll able to go to '''Step 3 (3d banner)'''.
| |
| | |
| </div>
| |
| | |
| </div>
| |
| | |
| '''Step 3:'''
| |
| | |
| <div class="ToggleTriggerAnchor bbCodeSpoilerContainer">
| |
| | |
| <span>Spoiler: <span class="SpoilerTitle">VC NES 3D banners</span></span>
| |
| <div class="SpoilerTarget bbCodeSpoilerText">
| |
| | |
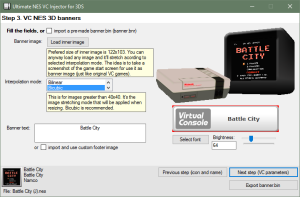
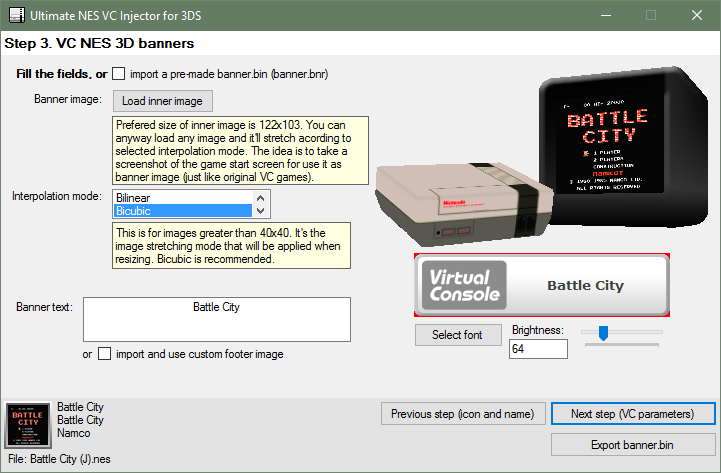
| This is the '''Step 3''' main screen:
| |
| [[File:proxy.php?image=https%3A%2F%2Fi.imgur.com%2FT1lL2M2.png&hash=6f7d9ac2154006f8f79c0dead45ebfd1|class=bbCodeImage LbImage|[?IMG]]]
| |
| | |
| ''Note:'' The program will load some default values (based on those in '''Step 2'''), but you can anyway replace these default values with ohter ones.
| |
| Example: if you want the icon and 3D banner to have different images, then first complete '''Step 2''' with the icon image that you want and then complete '''Step 3''' with the banner image that you want. Otherwise if you are too lazy or you want the same standard as legit VC CIA, leave it as is.
| |
| | |
| For this example, I'll let the same banner image as the icon one, but <span style="color: rgb(0, 0, 0)">I'll edit the bottom banner, importing a custom one I made with GIMP (using the '''import and use custom footer image''' option):
| |
| | |
| [[File:proxy.php?image=https%3A%2F%2Fi.imgur.com%2F1zwuZmP.png&hash=1bf062597dad7720ef3b970d391f273b|class=bbCodeImage LbImage|[?IMG]]]�
| |
| You can also make your own text banner without leaving the application, as a quick and easy solution. You can change the font type, size, and brightness. Also there's a preview of that text banner (ignore the red borders, they won't be there in the console).
| |
| | |
| Doing my changes for this example:</span>
| |
| [[File:proxy.php?image=https%3A%2F%2Fi.imgur.com%2FygxdczG.png&hash=29a1124fa0dc74dcb33ac769bb22b422|class=bbCodeImage LbImage|[?IMG]]]
| |
| | |
| When you complete or modify all the fields you'll able to go to '''Step 4 (VC parameters)'''.
| |
| | |
| </div>
| |
| | |
| </div>
| |
| | |
| '''Step 4:'''
| |
| | |
| <div class="ToggleTriggerAnchor bbCodeSpoilerContainer">
| |
| | |
| <span>Spoiler: <span class="SpoilerTitle">VC parameters</span></span>
| |
| <div class="SpoilerTarget bbCodeSpoilerText">
| |
| | |
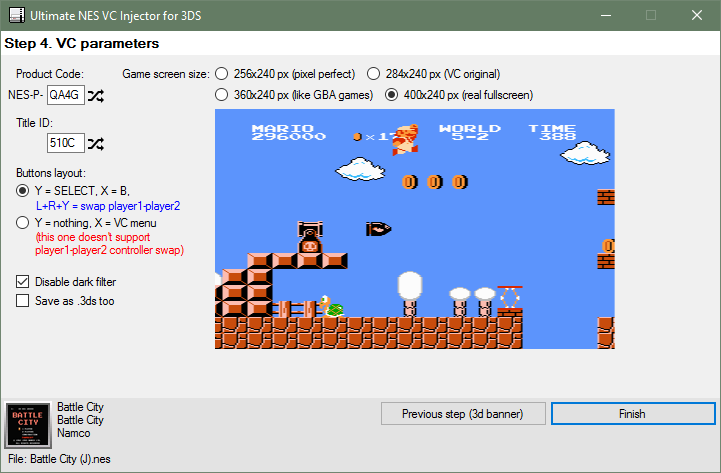
| This is the '''Step 4''' main screen:
| |
| [[File:proxy.php?image=https%3A%2F%2Fi.imgur.com%2FbeltxSC.png&hash=04ecf91c1c2e353c0f28627bab1655db|class=bbCodeImage LbImage|[?IMG]]]
| |
| | |
| <div style="text-align: center">
| |
| | |
| ?
| |
| | |
| </div>
| |
| '''Yaaay! A lot of options!
| |
| | |
| Buttons layout:'''
| |
| | |
| * Y = SELECT, X = B, L+R+Y = swap player1-player2
| |
| * Y = nothing, X = VC menu
| |
| | |
| If the first one is checked, the VC will be able to controll player2 (swaping controllers, holding L+R+Y). Also, the Y button will acts as SELECT button, and X button will act as B button (perfect for Mario games)
| |
| | |
| If the second option is checked, there won't be any 2nd player control (holding L+R+Y will do nothing), and also, the X button will summon the VC touch menu.
| |
| | |
| I didn't do that button layouts, and I (you) '''can't''' customize as I (you) want, due to it's harcoded on the VC.
| |
| | |
| '''Disable dark filter:''' If this is checked, there won't be any ugly dark filter. You can preview the changes of this.
| |
| | |
| '''Game screen size:'''
| |
| It's just that, a screen size picker. You can preview the changes of this.
| |
| | |
| For this tutorial, I want full screen, dark filter disabled, and the first button layout.
| |
| | |
| [[File:proxy.php?image=https%3A%2F%2Fi.imgur.com%2FoWQkZDG.png&hash=37321b1f27f000ec364e087835ee6213|class=bbCodeImage LbImage|[?IMG]]]
| |
| | |
| Once we have everything ready, press '''Finish''' button.
| |
| | |
| That's it! The application will ask you where do you want to save the CIA file and It took some seconds to create it.
| |
| When the CIA is ready, the application will let you know it.
| |
| | |
| [[File:proxy.php?image=https%3A%2F%2Fi.imgur.com%2FOargC6g.png&hash=69367b7f9a3c5801a7cf2055d54d282d|class=bbCodeImage LbImage|[?IMG]]]
| |
| | |
| Then you can install the CIA in sdcard using any CIA manager (actually I use the new FBI).
| |
| | |
| </div>
| |
| | |
| </div>
| |
| | |
| </div>
| |
| | |
| </div>
| |
| (The tutorial's screenshot are from v1.0)
| |
| | |
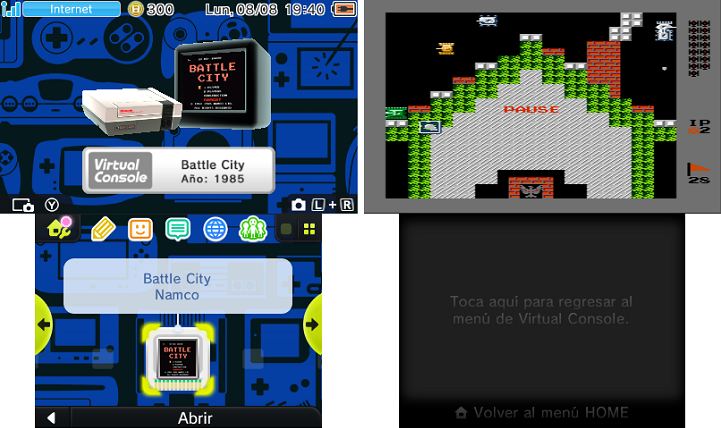
| '''Console screenshots:'''
| |
| | |
| | |
| <div style="text-align: center">
| |
| | |
| <div class="ToggleTriggerAnchor bbCodeSpoilerContainer">
| |
| | |
| <span>Spoiler</span>
| |
| <div class="SpoilerTarget bbCodeSpoilerText">
| |
| | |
| [[File:proxy.php?image=https%3A%2F%2Fi.imgur.com%2FWqaPPf1.png&hash=1fb03304d02628f8e2ebb39dca6ac1fc|class=bbCodeImage LbImage|[?IMG]]]
| |
| | |
| </div>
| |
| | |
| </div>
| |
| <div class="ToggleTriggerAnchor bbCodeSpoilerContainer">
| |
| | |
| <span>Spoiler</span>
| |
| <div class="SpoilerTarget bbCodeSpoilerText">
| |
| | |
| [[File:proxy.php?image=https%3A%2F%2Fi.imgur.com%2FhT0S9sT.png&hash=a993265caa56cf67b4cc47b21e5cdaf2|class=bbCodeImage LbImage|[?IMG]]]
| |
| | |
| </div>
| |
| | |
| </div>
| |
| <div class="ToggleTriggerAnchor bbCodeSpoilerContainer">
| |
| | |
| <span>Spoiler</span>
| |
| <div class="SpoilerTarget bbCodeSpoilerText">
| |
| | |
| [[File:proxy.php?image=https%3A%2F%2Fi.imgur.com%2Fpohv7Q9.png&hash=cdd55af47b648614c35c4a01fd048982|class=bbCodeImage LbImage|[?IMG]]]
| |
| | |
| </div>
| |
| | |
| </div>
| |
| | |
| </div>
| |
| '''TODO, petitions, etc:''' For now I'll just read this thread and make changes acording to the best for all. The code will be released much later; I'm planing to do a series of VC injectors... If a new version comes, I'll post here and I'll edit the OP.
| |
| | |
| '''Download links:'''
| |
| | |
| | |
| <div class="ToggleTriggerAnchor bbCodeSpoilerContainer">
| |
| | |
| <span>Spoiler</span>
| |
| <div class="SpoilerTarget bbCodeSpoilerText">
| |
| | |
| '''v1.2: [https://mega.nz/#!iphjCLpb!-r4INdwoSrfSBpuuGNKnHah4BnWZRsY9kKxRJdnZfRg MEGA]''' | |
| v1.1: [https://mega.nz/#!uwJGxYzB!uuwhU_C7ZyW36_IwPA84MgRmbEAnthD2q0lJywtqgRE MEGA]
| |
| v1.0: [https://mega.nz/#!29wVXJAC!uYc2S56m0nSetknHIBneWcoDR6vlWsmUm4Jpd1qHZgA MEGA]
| |
| | |
| </div>
| |
| | |
| </div>
| |
| | |
| '''Changelog:'''
| |
| | |
| | |
| <div class="ToggleTriggerAnchor bbCodeSpoilerContainer">
| |
| | |
| <span>Spoiler</span>
| |
| <div class="SpoilerTarget bbCodeSpoilerText">
| |
| | |
| '''v1.2:
| |
| * Fixed: Now the injections should be region-free (not tested). | | * Fixed: Now the injections should be region-free (not tested). |
| * Fixed: Now the parental control won't be a trouble. | | * Fixed: Now the parental control won't be a trouble. |
| + Added: Now you can choose 3 different types of 3D Banner, '''NES''', '''Famicom''' and '''Famicom Disk System'''! (thanks to [https://gbatemp.net/members/358746/ @cots])
| | * Added: Now you can choose 3 different types of 3D Banner, NES, Famicom and Famicom Disk System (thanks to [https://gbatemp.net/members/358746/ @cots]). |
| | |
| Screenshot of Ice Climber inject with Famicom Disk System 3D banner:
| |
| [[File:proxy.php?image=https%3A%2F%2Fi.imgur.com%2F1snWfN2.jpg&hash=038870f2ffccd06ee9593181613451a2|class=bbCodeImage LbImage|[?IMG]]]
| |
| | |
| | |
| v1.1:'''
| |
| + Added: more roms compatibility (still not even 99%)
| |
| + Added: Game recognition. ''Most'' of official roms (non hacks/translated/HVC roms) now will be recognized and it'll auto-complete game name and publisher.
| |
| * More Stability™ (?)
| |
| | |
| '''v1.0:''' Initial release
| |
| | |
| </div>
| |
| | |
| </div>
| |
| | |
| | |
| Enjoy!
| |
| | |
| ''Is your ROM not working? Try [https://gbatemp.net/threads/release-basicnesinjector-automatically-inject-nes-vc-rom-files.435086/ this] instead.''
| |
|
| |
|
| <div class="messageTextEndMarker">
| | '''v1.1''' |
| | * Added: more roms compatibility (still not even 99%). |
| | * Added: Game recognition. ''Most'' of official roms (non hacks/translated/HVC roms) now will be recognized and it'll auto-complete game name and publisher. |
| | * More Stability™ (?). |
|
| |
|
| �
| | '''v1.0''' |
| | * Initial release. |
|
| |
|
| </div></blockquote>
| | ==External links== |
| | GBAtemp - https://gbatemp.net/threads/release-ultimate-nes-vc-injector-for-3ds.437415 |
