More actions
m (Text replacement - "↵Category:Computer Emulators on DS" to "") |
No edit summary |
||
| (One intermediate revision by the same user not shown) | |||
| Line 8: | Line 8: | ||
|version=R3 | |version=R3 | ||
|license=Mixed | |license=Mixed | ||
|download=https://dlhb.gamebrew.org/ | |download=https://dlhb.gamebrew.org/dshomebrew2/minivmacds_r3.zip | ||
|website=http://lazyone.drunkencoders.com/wordpress | |website=http://lazyone.drunkencoders.com/wordpress | ||
}} | }} | ||
Latest revision as of 01:45, 21 August 2024
| Mini vMac DS | |
|---|---|
 | |
| General | |
| Author | Lazyone |
| Type | Computer |
| Version | R3 |
| License | Mixed |
| Last Updated | 2008/11/09 |
| Links | |
| Download | |
| Website | |
This is a Macintosh Plus emulator for the NDS. It is a port of Paul C. Pratt's Mini vMac, which is base upon upon Richard F. Bannister’s Macintosh port of vMac (originally written by by Philip Cummins and others).
Installation
Note: It requires a Macintosh Plus BIOS ROM (vMac.ROM) and disk images to run. Please refer to readme for instructions of how to extract the system install disks (Mini vMac DS can run up to System 7.5.5, however it is recommended using System 6.0.8 for best performance).
Once you have the ROM and disks images prepared, choose your build for the Mini vMac DS:
- 2MB - Slightly faster, does not require Slot-2 RAM Expansion.
- 4MB - Requires a Slot-2 RAM Expansion, do not require a slot-1 card, unless it's the opera expansion.
DLDI Patch MinivMac.NDS for your homebrew device.
Copy minivmac.ini and the vmac folder to the root of your cf/sd media.
Copy your disk images (disk0.img, disk1.img...disk6.img) and vMac.ROM into the vmac folder.
See configuration file minivmac.ini for information on how your disk images should be named.
User guide
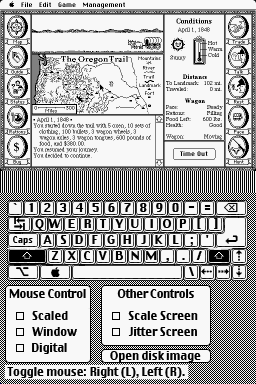
Mouse mode
Scaled:
- In this mode the DS's touch screen is used to move the mouse to a specific point on the mac screen.
- For example, tapping the lower-right corner of the touchscreen should scroll to the trash.
- When you scroll the screen in this mode the Mac's cursor will always be in the center of the screen unless you are near an edge.
- The default key for click in this mode is the up arrow.
Trackpad:
- This mode sort of works like a laptop's mouse, drag the stylus across the touchscreen and the mac's mouse will move in that direction.
- Click defaults to the up arrow key in this mode.
DPAD/ABXY:
- You can scroll the mouse with the DPAD and ABXY buttons in this mode.
- Click defaults to the X button in this mode.
- You might have noticed that you are unable to click the options and keyboard that are on the touchscreen.
- This is because the screen is locked in mouse mode, to put it into keyboard/control mode press the start key.
The keyboard will then be accessible, you can also switch mouse modes. It would be a good idea to try out all the mouse modes to get the hang of them, you can leave keyboard mode by pressing the start key again. The keyboard itself is easy to use, just enter keyboard mode by pressing start and type away.
Tap/click mode:
- In this mode a scaled display is put on the touch screen and each tap counts as a click of the mac mouse.
- Double clicking in this mode is difficult so you can also click with the up arrow key (default).
Scale screen
Selecting this in keyboard/control mode will scale the screen by half letting you see the entire mac screen at once.
Since this scaling is done in software there is a performance hit.
FAQ
Q. I am getting a flashing question mark at bootup.
Your startup disk is either not bootable or named incorrectly. If you are not specifying your disks in the config file make sure your startup disk is called "disk0.dsk".
If that doesn't work try it on the PC/Mac version to verify that it is bootable. If you are still having problems send me an email.
Q. I am geting a flashing X at bootup.
You have an non bootable disk as your startup disk, make sure your disk is bootable and that it is the first disk to be loaded.
Q. Mini vMac cannot find vMac.ROM/There is no keyboard.
Make sure the file vMac.ROM and the ui_gfx folder are in their proper location. This should be /vmac/ unless you modified the working directory in your config file.
Q. It says Failed to initialize filesystem.
Make sure that Mini vMac has been patched with the proper DLDI driver.
Q. It says No supported external ram found on the gba bus.
A few things could be wrong here:
- You do not have a slot-2 ram expansion.
- The wrong ram device type has been set in the config file.
- Your ram expansion is not supported.
Q. It's running slowly.
Emulating a Macintosh Plus is a lot of work, especially for the DS. Usually the port runs at between 25 and 40 frames per second, this drops slightly when using the ram expansion build or the scaled display mode.
Controls
Select+Down - Fixed restart (re-insert all of the disks after a restart)
Select+Right - Enter tap/click mode
Media
Mini vMac DS Preview (TheLazy1)
External links
- Author's website - http://lazyone.drunkencoders.com/wordpress/ (archived)
