More actions
No edit summary |
m (Text replacement - " the the " to " the ") |
||
| (2 intermediate revisions by the same user not shown) | |||
| Line 5: | Line 5: | ||
|author=Random0666 | |author=Random0666 | ||
|lastupdated=2020/10/04 | |lastupdated=2020/10/04 | ||
|type= | |type=Sysmodules | ||
|version=1.0.3 | |version=1.0.3 | ||
|license=GPL-2.0 | |license=GPL-2.0 | ||
|download=https://dlhb.gamebrew.org/switchhomebrews/switchpresencenx.7z | |download=https://dlhb.gamebrew.org/switchhomebrews/switchpresencenx.7z?k33p0fil35 | ||
|website=https://github.com/Random0666/SwitchPresence | |website=https://github.com/Random0666/SwitchPresence | ||
|source=https://github.com/Random0666/SwitchPresence | |source=https://github.com/Random0666/SwitchPresence | ||
}} | }} | ||
{{obsolete}} | {{obsolete}} | ||
| Line 36: | Line 35: | ||
*Launch the sysmodule and connect the client to the switch (see Usage). | *Launch the sysmodule and connect the client to the switch (see Usage). | ||
*Once connected, click on Utils > Export icons and choose the path where your icons will be exported with the right name/icon size. | *Once connected, click on Utils > Export icons and choose the path where your icons will be exported with the right name/icon size. | ||
*Go to your rich presence app and add all the icons that you just exported with the name they were given and choose | *Go to your rich presence app and add all the icons that you just exported with the name they were given and choose the type "Large". | ||
*(optional) add a "Small" asset named "icon". This will used as the small image on your profile. (You can use [https://raw.githubusercontent.com/Random0666/Useless-stuff/master/SwitchRichPresence/images/icon.png this one].) | *(optional) add a "Small" asset named "icon". This will used as the small image on your profile. (You can use [https://raw.githubusercontent.com/Random0666/Useless-stuff/master/SwitchRichPresence/images/icon.png this one].) | ||
*Open the config.txt file at the root of the client (If this file doesn't exit, running the client once closing it will create a new one.) and edit the client_id line with the client ID of the rich presence app you just created. | *Open the config.txt file at the root of the client (If this file doesn't exit, running the client once closing it will create a new one.) and edit the client_id line with the client ID of the rich presence app you just created. | ||
Latest revision as of 23:40, 27 June 2024
| switchpresence | |
|---|---|
 | |
| General | |
| Author | Random0666 |
| Type | Sysmodules |
| Version | 1.0.3 |
| License | GPL-2.0 |
| Last Updated | 2020/10/04 |
| Links | |
| Download | |
| Website | |
| Source | |
| This application has been obsoleted by one or more applications that serve the same purpose, but are more stable or maintained. |
A Nintendo Switch custom sysmodule for Discord Rich Presence.
Note: This Project is very outdated and no longer maintained! Please use SwitchPresence-Rewritten instead.
Installation
Install SwitchPresence (Switch)
- Copy switch-rich-presence.kip to your sd card and edit the hekate_ipl.ini to include the sysmodule.
- (You can for example add a configuration like this.)
[Discord Rich Presence]
kip1=switch-rich-presence.kip
- Boot your switch into RCM mode and run hekate on it.
- Launch your hekate configuration with rich presence and wait until your switch turns on completely. (Also make sure that your switch is connected to internet.)
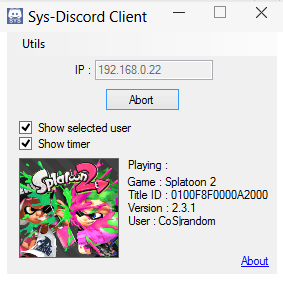
- Open the client (SwitchRichPresence.exe) and click the "Connect" button.
Note: If you want the icon of the game to show up on Discord, you will also need to setup the Rich Presence app.
Setup a Rich presence app (PC)
- Go to this link.
- Create a new App and give it the name that will be shown on your profile (usually "Nintendo Switch").
- Enable Rich Presence for you app.
- Launch the sysmodule and connect the client to the switch (see Usage).
- Once connected, click on Utils > Export icons and choose the path where your icons will be exported with the right name/icon size.
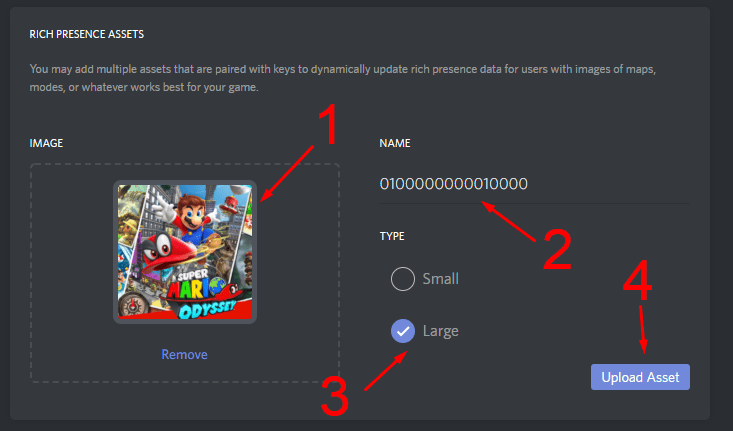
- Go to your rich presence app and add all the icons that you just exported with the name they were given and choose the type "Large".
- (optional) add a "Small" asset named "icon". This will used as the small image on your profile. (You can use this one.)
- Open the config.txt file at the root of the client (If this file doesn't exit, running the client once closing it will create a new one.) and edit the client_id line with the client ID of the rich presence app you just created.
Screenshots
Setup Rich Presence app

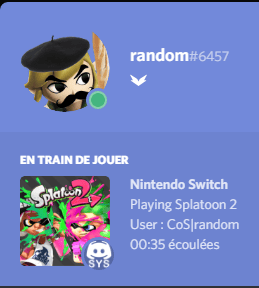
SwitchPresence and Client


Known issues
The switch might hang on when getting into sleep mode or when turning it off. If that happens, hard shutdown your switch by pressing the POWER button for ~15 seconds.
Changelog
v1.0.3
- Fixed Error while receiving data issue.
- Added option to edit client ID via the app.
v1.0.2
- Fixed support for other sysmodules.
- Fixed process whitelist.
v1.0.1
- Fixed a bug for FWs >= 5.x.x.
Credits
Huge thanks to everyone who contributed to the amazing documentation on SwitchBrew.
