More actions
No edit summary |
m (Text replacement - "type=Operating systems" to "type=Operating Systems") |
||
| (18 intermediate revisions by the same user not shown) | |||
| Line 1: | Line 1: | ||
{{Infobox Wii Homebrews | {{Infobox Wii Homebrews | ||
|title=XWhiite Linux | |title=XWhiite Linux | ||
|image=xwhiitelinuxwii2. | |image=xwhiitelinuxwii2.png | ||
|description=Running Linux on Wii. | |description=Running Linux on Wii. | ||
|author=bertjan | |author=bertjan | ||
|lastupdated=2008/12/02 | |lastupdated=2008/12/02 | ||
|type=Operating | |type=Operating Systems | ||
|version=0.2 | |version=0.2 | ||
|license=Mixed | |license=Mixed | ||
|download=https://dlhb.gamebrew.org/wiihomebrews/xwhiitelinuxwii.7z | |download=https://dlhb.gamebrew.org/wiihomebrews/xwhiitelinuxwii.7z?k33p0fil35 | ||
|website=https://gbatemp.net/threads/wii-linux-xwhiite-0-2-with-wi-fi-in-2020-tutorial.570945/ | |website=https://gbatemp.net/threads/wii-linux-xwhiite-0-2-with-wi-fi-in-2020-tutorial.570945/ | ||
}} | }} | ||
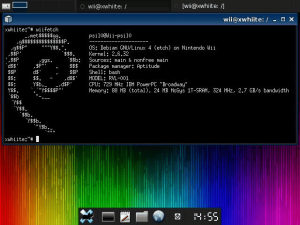
XWhiite is a version of Whiite with the X.Org environment successfully implemented. It uses kernel 2.6.27b and includes some applications such as Firefox. The installation process uses the "whiite" method, and it has been updated to version 0.2. XWhiite was created by bertjan and last updated on December 2nd, 2008. | |||
Keep in mind, the Wii's specs are limited with only 88MB of RAM, 3MB of VRAM, and a 729MHz single-core CPU, so performance may not be optimal. | |||
== | ==User guide== | ||
===How to setup=== | |||
The following guide is based on [https://gbatemp.net/threads/wii-linux-xwhiite-0-2-with-wi-fi-in-2020-tutorial.570945/ XWhiite 0.2 with Wi-Fi in 2020 tutorial] written by VMHoss. | |||
Before proceeding you need to: | |||
*Download [https://www.mediafire.com/?qme1y93ek6ttc this] and unzip it on your PC. Insert a SD card (FAT16) (SDHC >4GB) into the slot on the same PC. | |||
*Follow [https://wii.guide/str2hax this guide] if your Wii hasn't been homebrewed/hacked yet. And install [https://wii.guide/hbc BootMii]. | |||
If you are following the previous step, move the "BOOTMII" (not case sensitive) folder to your desktop. Then extract the "apps" folder from the "apps" ZIP file within the Wii Linux ZIP and place it on the SD card. Unzip the Wii Linux ZIP file to the root of a FAT32-formatted USB drive and delete the "apps" ZIP in the root. | |||
Use a USB keyboard, and an optical USB mouse if desired. Insert the SD card in the Wii's SD slot and the USB drive in the "usb0" slot located at the right back of the Wii or bottom for horizontal Wii. If unsure, refer to the red square outlining the slot. | Use a USB keyboard, and an optical USB mouse if desired. Insert the SD card in the Wii's SD slot and the USB drive in the "usb0" slot located at the right back of the Wii or bottom for horizontal Wii. If unsure, refer to the red square outlining the slot. | ||
https://dlhb.gamebrew.org/wiihomebrews/ | {| role="presentation" class="wikitable mw-collapsible mw-collapsed" | | ||
! USB slot image | |||
|- | |||
| https://dlhb.gamebrew.org/wiihomebrews/xwhiitelinuxwii6.jpg | |||
|- | |||
|} | |||
Turn on the Wii. Open the Homebrew Channel. Open the "whiite-linux-installer-BETA1" application. Navigate using the keyboard arrow keys and press ENTER to confirm. Select "ok" for FAT allocation (256MB recommended). Select "ok" for all options and wait (waiting time can be very long). The application has a built-in black screensaver, press ENTER to exit it. Continue waiting. Once it states that it is finished, the Wii will reboot. | |||
Remove the SD card from the Wii. Download [http://downloads.sourceforge.net/gc-linux/mikep5-zImage-2.6.32.mini.576i(PAL).elf this file] (it doesn't matter if it's PAL version). Insert the SD card into the PC. Locate the "BOOTMII" folder, delete "ppcboot.elf" and rename "mikep5-zImage-2.6.32.mini.576i(PAL).elf" to "ppcboot.elf" and place it in the "BOOTMII" folder. | |||
Remove the SD card from the PC and insert it in the Wii. Open the Homebrew Channel. Press the HOME button, then select the "bootmii" button. This will start Wii Linux. Wait for a minute or two and when the Wii displays a GUI with green or checkered B/W pixels, wait for the XFCE start menu to appear. | |||
On the start menu, select the power button, then select "log out." When the countdown begins, press ENTER on the keyboard. Log in with the following credentials: | On the start menu, select the power button, then select "log out." When the countdown begins, press ENTER on the keyboard. Log in with the following credentials: | ||
*Username: root | *Username: root | ||
*Password: whiite | *Password: whiite | ||
Type in "startxfce4" and press ENTER. This will start Debian 4 (etch) as the root account with full access to the system. | Type in "startxfce4" and press ENTER. This will start Debian 4 (etch) as the root account with full access to the system. | ||
===How to | ===How to add WiFi=== | ||
Open a Terminal (Xterm) window and do this: | Open a Terminal (Xterm) window and do this: | ||
cd /home/wii/ | |||
dpkg -i *.deb | |||
cd /home/wii/ | |||
dpkg -i *.deb | |||
After that has completed, move on to this: | After that has completed, move on to this: | ||
<code>cd / </code> | |||
<code>cd /</code> | |||
<code>tar -xzvf /home/wii/openfwwf-5.2-bin.tar.gz</code> | <code>tar -xzvf /home/wii/openfwwf-5.2-bin.tar.gz</code> | ||
| Line 57: | Line 59: | ||
Close the Terminal window and open another one after it's done. | Close the Terminal window and open another one after it's done. | ||
nano /etc/network/interfaces | |||
Make sure it looks like this: | Make sure it looks like this: | ||
auto wlan1 iface wlan1 inet dhcp | |||
auto wlan1 iface wlan1 inet dhcp | wpa-ssid YOUR_ROUTER_NAME_GOES_HERE | ||
wpa-psk YOUR_WIFI_PASSOWRD_GOES_HERE | |||
wpa-key-mgmt WPA-PSK | |||
wpa-pairwise TKIP CCMP | |||
wpa-group TKIP CCMP | |||
wpa-proto WPA RSN | |||
wpa-ap-scan 1 | |||
wpa-scan-ssid 1 | |||
Edit the "YOUR_PASSWORD" to your WIFI password. | |||
Edit the "ROUTER_NAME" to your WIFI name. | |||
==Additional | Then save it by CTRL+X then pressing Y. You now have a Wii Linux machine that can be used as a low-performance PC or as a web server. | ||
You | |||
===Additional stuff=== | |||
You can get a lot of applications for the PPC build of Debian 4. Get them with Synaptic Pachage Manager, found in the (system) tray in the (apps) menu in the XFCE menu. | |||
*GIMP works like a charm on the Wii with resolutions under 1920x1080. | |||
*Audacity also works fine, unless if you want a newer build of it. | |||
*Blender3D is availble, but it only works with OpenGL drivers. The Wii has X11 drivers, and NO, I haven't found the OpenGL drivers yet. | |||
*Any application without OpenGL support should work fine. | |||
*Python IDLE 2.5 has a working TURTLE module. | |||
*You can also get XFCE themes. | |||
To get XFCE themes, you will need a laptop or PC that can read ext3 filesystems. If you're using Windows, you can use DiskGenius or Diskinternals Linux Reader. Browse through the [https://www.xfce-look.org/browse/cat/138/page/90/ord/latest/ XFCE-LOOK website] for maximum compatibility. Then, copy the theme folder to the /usr/local/share/themes/ directory on the SD card. Insert the SD card into the Wii and boot Linux. Log in as root, go to the settings manager of XFCE, click on "user interface," and select a theme. Good luck! | To get XFCE themes, you will need a laptop or PC that can read ext3 filesystems. If you're using Windows, you can use DiskGenius or Diskinternals Linux Reader. Browse through the [https://www.xfce-look.org/browse/cat/138/page/90/ord/latest/ XFCE-LOOK website] for maximum compatibility. Then, copy the theme folder to the /usr/local/share/themes/ directory on the SD card. Insert the SD card into the Wii and boot Linux. Log in as root, go to the settings manager of XFCE, click on "user interface," and select a theme. Good luck! | ||
==Screenshots== | ==Screenshots== | ||
https://dlhb.gamebrew.org/wiihomebrews/ | https://dlhb.gamebrew.org/wiihomebrews/xwhiitelinuxwii3.png | ||
https://dlhb.gamebrew.org/wiihomebrews/ | https://dlhb.gamebrew.org/wiihomebrews/xwhiitelinuxwii4.png | ||
==Media== | ==Media== | ||
'''Linux on | '''Installing Linux on the Nintendo Wii''' ([https://www.youtube.com/watch?v=mrdR43-sqKs Michael MJD])<br> | ||
<youtube> | <youtube>mrdR43-sqKs</youtube> | ||
==External Links== | ==External Links== | ||
* | * GBAtemp - https://gbatemp.net/threads/wii-linux-xwhiite-0-2-with-wi-fi-in-2020-tutorial.570945/ | ||
* WiiBrew - https://wiibrew.org/wiki/Wii-Linux/Distros#Whiite | * WiiBrew - https://wiibrew.org/wiki/Wii-Linux/Distros#Whiite | ||
Latest revision as of 09:34, 7 Mayıs 2024
| XWhiite Linux | |
|---|---|
 | |
| General | |
| Author | bertjan |
| Type | Operating Systems |
| Version | 0.2 |
| License | Mixed |
| Last Updated | 2008/12/02 |
| Links | |
| Download | |
| Website | |
XWhiite is a version of Whiite with the X.Org environment successfully implemented. It uses kernel 2.6.27b and includes some applications such as Firefox. The installation process uses the "whiite" method, and it has been updated to version 0.2. XWhiite was created by bertjan and last updated on December 2nd, 2008.
Keep in mind, the Wii's specs are limited with only 88MB of RAM, 3MB of VRAM, and a 729MHz single-core CPU, so performance may not be optimal.
User guide
How to setup
The following guide is based on XWhiite 0.2 with Wi-Fi in 2020 tutorial written by VMHoss.
Before proceeding you need to:
- Download this and unzip it on your PC. Insert a SD card (FAT16) (SDHC >4GB) into the slot on the same PC.
- Follow this guide if your Wii hasn't been homebrewed/hacked yet. And install BootMii.
If you are following the previous step, move the "BOOTMII" (not case sensitive) folder to your desktop. Then extract the "apps" folder from the "apps" ZIP file within the Wii Linux ZIP and place it on the SD card. Unzip the Wii Linux ZIP file to the root of a FAT32-formatted USB drive and delete the "apps" ZIP in the root.
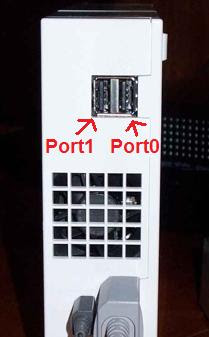
Use a USB keyboard, and an optical USB mouse if desired. Insert the SD card in the Wii's SD slot and the USB drive in the "usb0" slot located at the right back of the Wii or bottom for horizontal Wii. If unsure, refer to the red square outlining the slot.
| USB slot image |
|---|

|
Turn on the Wii. Open the Homebrew Channel. Open the "whiite-linux-installer-BETA1" application. Navigate using the keyboard arrow keys and press ENTER to confirm. Select "ok" for FAT allocation (256MB recommended). Select "ok" for all options and wait (waiting time can be very long). The application has a built-in black screensaver, press ENTER to exit it. Continue waiting. Once it states that it is finished, the Wii will reboot.
Remove the SD card from the Wii. Download this file (it doesn't matter if it's PAL version). Insert the SD card into the PC. Locate the "BOOTMII" folder, delete "ppcboot.elf" and rename "mikep5-zImage-2.6.32.mini.576i(PAL).elf" to "ppcboot.elf" and place it in the "BOOTMII" folder.
Remove the SD card from the PC and insert it in the Wii. Open the Homebrew Channel. Press the HOME button, then select the "bootmii" button. This will start Wii Linux. Wait for a minute or two and when the Wii displays a GUI with green or checkered B/W pixels, wait for the XFCE start menu to appear.
On the start menu, select the power button, then select "log out." When the countdown begins, press ENTER on the keyboard. Log in with the following credentials:
- Username: root
- Password: whiite
Type in "startxfce4" and press ENTER. This will start Debian 4 (etch) as the root account with full access to the system.
How to add WiFi
Open a Terminal (Xterm) window and do this:
cd /home/wii/
dpkg -i *.deb
After that has completed, move on to this:
cd /
tar -xzvf /home/wii/openfwwf-5.2-bin.tar.gz
Close the Terminal window and open another one after it's done.
nano /etc/network/interfaces
Make sure it looks like this:
auto wlan1 iface wlan1 inet dhcp
         wpa-ssid YOUR_ROUTER_NAME_GOES_HERE
         wpa-psk YOUR_WIFI_PASSOWRD_GOES_HERE
         wpa-key-mgmt WPA-PSK
         wpa-pairwise TKIP CCMP
         wpa-group TKIP CCMP
         wpa-proto WPA RSN
        wpa-ap-scan 1
         wpa-scan-ssid 1
Edit the "YOUR_PASSWORD" to your WIFI password.
Edit the "ROUTER_NAME" to your WIFI name.
Then save it by CTRL+X then pressing Y. You now have a Wii Linux machine that can be used as a low-performance PC or as a web server.
Additional stuff
You can get a lot of applications for the PPC build of Debian 4. Get them with Synaptic Pachage Manager, found in the (system) tray in the (apps) menu in the XFCE menu.
- GIMP works like a charm on the Wii with resolutions under 1920x1080.
- Audacity also works fine, unless if you want a newer build of it.
- Blender3D is availble, but it only works with OpenGL drivers. The Wii has X11 drivers, and NO, I haven't found the OpenGL drivers yet.
- Any application without OpenGL support should work fine.
- Python IDLE 2.5 has a working TURTLE module.
- You can also get XFCE themes.
To get XFCE themes, you will need a laptop or PC that can read ext3 filesystems. If you're using Windows, you can use DiskGenius or Diskinternals Linux Reader. Browse through the XFCE-LOOK website for maximum compatibility. Then, copy the theme folder to the /usr/local/share/themes/ directory on the SD card. Insert the SD card into the Wii and boot Linux. Log in as root, go to the settings manager of XFCE, click on "user interface," and select a theme. Good luck!
Screenshots


Media
Installing Linux on the Nintendo Wii (Michael MJD)
